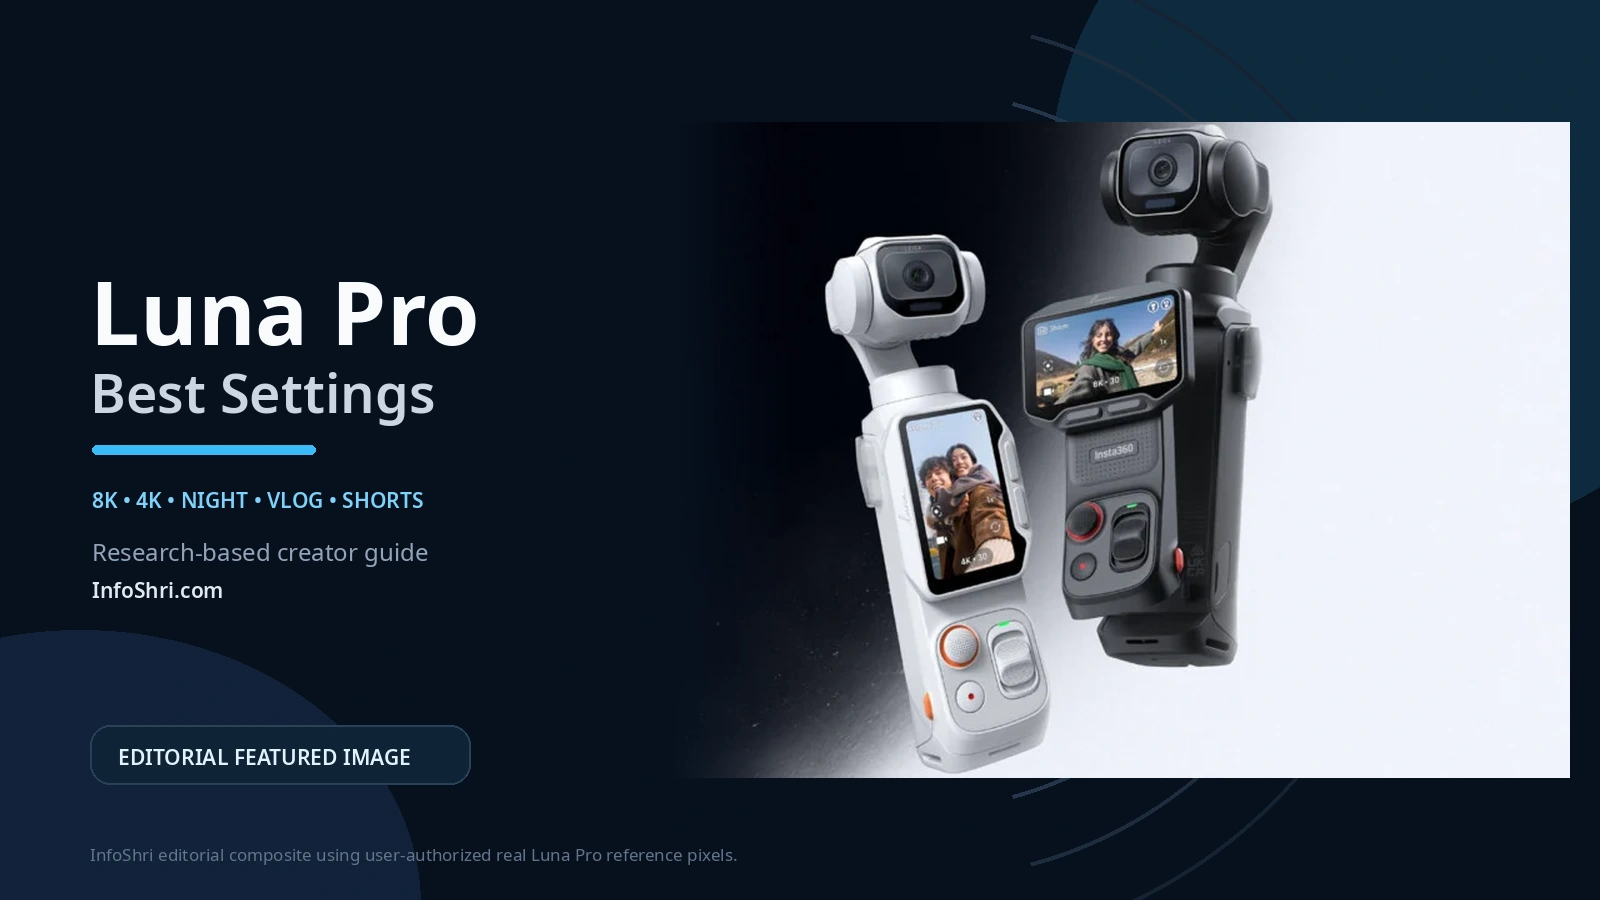
अगर आपने Insta360 Luna Pro खरीदी है और camera खोलते ही 8K, 4K120, PureVideo, I-Log, Dolby Vision, AF-C, Product Showcase, Tracking, Roll Lock, Beauty, Filters और कई audio options देखकर confuse हो गए हैं, तो सबसे जरूरी बात पहले समझ लीजिए: best setting का मतलब maximum setting नहीं होता।
Luna Pro 8K30 तक record कर सकती है, लेकिन इसका मतलब यह नहीं कि हर YouTube video 8K में shoot करनी चाहिए। 4K120 available है, लेकिन यह everyday vlog mode नहीं है। I-Log professional grading के लिए useful है, लेकिन अगर आप footage को जल्दी edit करके upload करना चाहते हैं तो Standard color ज्यादा practical हो सकती है। इसी तरह PureVideo low light के लिए important है, पर हर रात की shot में automatically वही एक सही answer नहीं है—क्योंकि normal Video mode में भी camera low light detect होने पर Low-Light Enhancement शुरू कर सकती है। [1][2]
इस guide का goal आपको “एक universal preset” देना नहीं है। ऐसा preset exist ही नहीं करता। Goal यह है कि आप situation देखकर 10–15 seconds में सही starting setup चुन सकें: normal YouTube, walking vlog, night market, Shorts, travel, product review, talking head, fast action या professional color grading।
यह InfoShri का hands-on camera test नहीं है। Recommendations current official Insta360 Luna Series documentation, current firmware-sensitive feature tables और independent Luna Pro testing/reviews पर आधारित research-based starting points हैं। Research date: 17 September 2026. Exact current firmware build Insta360 की public support page पर number के रूप में expose नहीं हुआ; official documentation camera/app के अंदर version check करने को कहती है। इसलिए अपनी camera copy पर Settings > Camera Info > Firmware Version और Insta360 app में update prompt जरूर check करें। [3]
एक और currentness note: Insta360 app का Luna Pro support September 2026 builds में add हुआ है। India App Store का cached snapshot v2.33.0 दिखा रहा था, जबकि दूसरे current App Store storefronts में newer 2.33.x rollout दिखी। इसलिए इस article में app features को एक universal build number से lock नहीं किया गया है—latest available build use करें। [4]
Quick Cheat Sheet: अगर अभी Camera लेकर निकलना है तो कौन-सी Setting Use करें?
अगर आप पूरी guide बाद में पढ़ेंगे और अभी तुरंत shoot करना है, तो नीचे की table को starting point मानिए। यह “perfect preset” नहीं है; light, motion और delivery के हिसाब से एक-दो settings बदल सकती हैं।
| Situation | Recommended starting point | Color / Exposure | Focus / Gimbal / Tracking | Audio | क्यों |
|---|---|---|---|---|---|
| Everyday YouTube / normal vlog | Video 4K25 या 4K30 | Standard, Auto या semi-auto exposure, AWB | AF-C, Roll Lock, Medium follow; tracking तभी जब camera आपको follow करे | Voice Enhancement + Front, अगर speech priority है | Quality, file size, editing और feature compatibility का practical balance |
| Walking vlog | 4K50/60 अगर smooth motion priority; 4K25/30 अगर light कम है | Standard; changing light में Auto useful | AF-C, Roll Lock, Medium; जरूरत पर person tracking | Voice Enhancement; windy outdoor में Wind Reduction test करें | Motion smoother हो सकती है, लेकिन high fps को ज्यादा light चाहिए |
| Travel day | 4K25/30 default; movement के लिए 4K50/60; selected hero shots 8K25/30 | Standard; AWB changing scenes में convenient | Roll Lock; Medium; tracking scene-dependent | Speech vs ambience के हिसाब से mode चुनें | पूरे दिन maximum mode चलाने की जरूरत नहीं |
| Maximum detail / crop | 8K25/30, 1× या जरूरत पर 2× Clarity Zoom | Standard या current menu में supported color workflow | Static/controlled framing; tracking तभी जब verified combination available हो | Scene-dependent | 8K का असली फायदा crop/reframe/detail है, “हर shot बेहतर” नहीं |
| Low light / night | PureVideo 4K25/30 quality-first starting point; moving scene में 4K50/60 consider करें | Auto/semi-auto; shutter unnecessarily fast न रखें | AF-C; stable gimbal; tracking को real scene में check करें | Voice/Wind/Original scene के अनुसार | Lower fps में हर frame को ज्यादा exposure time मिल सकती है |
| Talking head | Video 4K25/30 | Standard; controlled light में fixed WB/manual or semi-manual | AF-C, Face Priority; tripod पर tracking optional | External mic preferred; built-in में Voice Enhancement + Front test करें | Consistency और simple workflow |
| Product review / unboxing | Video 4K25/30 | Standard; fixed WB, controlled exposure | Product Showcase; Breathing Compensation जरूरत पर; Roll & Tilt Lock/locked framing | External mic या Voice Enhancement | Product-to-lens focus transitions के लिए practical |
| Shorts / Reels talking | Native 4K 9:16 25/30 | Standard | AF-C; Roll Lock; tracking if needed | Voice Enhancement + Front | Maximum native vertical detail |
| Shorts / dance / fitness | Native 3K 9:16 50/60 | Standard | AF-C; tracking; Medium/Fast follow depending movement | Music/ambience में Original Audio; speech में Voice | 4K vertical 30fps तक है, 3K vertical 60fps तक |
| Fast action | Video 4K50/60 normal-speed; 4K100/120 high temporal capture | Standard unless menu confirms another required mode | Tracking support scene/mode check करें; 4K100/120 पर zoom नहीं | Audio behavior workflow-dependent | High fps तभी जब motion benefit करे |
| Slow motion | Dedicated Slow-Mo 4K100/120; extreme slow-mo के लिए 1080p200/240 | Mode-supported controls | Tracking is officially supported in Slow-Mo, but exact behavior test करें | Dedicated slow-mo workflow | Slow-motion intent साफ रहता है |
| Professional grading | Video 4K25/30 + I-Log अगर current menu उस combination में offer करे | I-Log, controlled exposure/WB | Focus/gimbal scene-based | External mic preferred | I-Log का फायदा post-production grading flexibility है, badge नहीं |
Beginner default: 4K25/30 + Standard + Auto exposure + AWB + AF-C + Roll Lock + Medium follow speed. Speech vlog में Voice Enhancement + Front को starting point मान सकते हैं। अगर camera हाथ में है और frame manually control कर रहे हैं, tracking जरूरी नहीं।
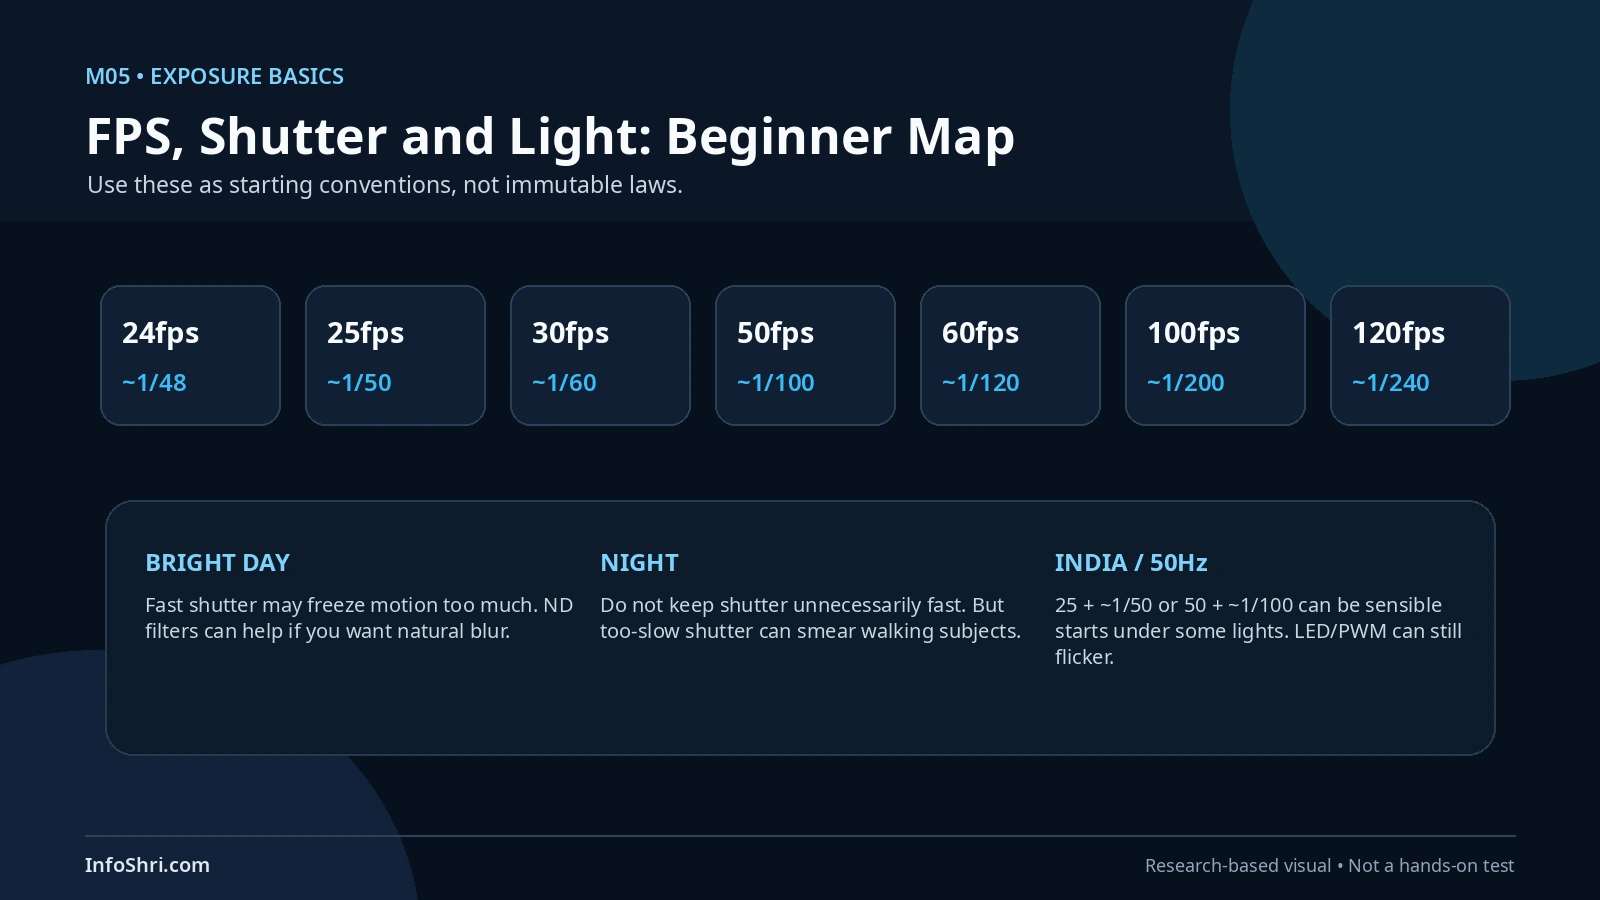
India में 25fps क्यों useful हो सकती है? हमारे mains power environment में 50Hz common है। 25fps के साथ लगभग 1/50 shutter, 50fps के साथ 1/100 और 100fps के साथ 1/200 कई traditional 50Hz lighting situations में flicker risk कम करने का sensible starting point हो सकता है। लेकिन LED drivers और PWM अलग frequency पर flicker कर सकते हैं, इसलिए इसे guarantee मत समझिए। Luna Pro के लिए dedicated anti-flicker control current official public docs में reliably verify नहीं हुआ। अगर screen/LED sign banding दिखे तो frame rate और shutter दोनों बदलकर test करें।
सबसे important rule: पहले scene decide करें, फिर setting। “8K है तो 8K”, “pro हूँ तो I-Log”, “night है तो ISO 6400”, “cinematic चाहिए तो 24fps”—ये shortcuts अक्सर गलत decision बनाते हैं।
8K, 4K30, 4K60 और 4K120 में कौन-सा कब Use करें?
Luna Pro का normal Video mode 8K 16:9 और 2.35:1 में 24/25/30fps तक जाता है। 4K 16:9 में 24/25/30/48/50/60/100/120fps available हैं। Native portrait 4K 9:16 24/25/30fps तक है, जबकि 3K 9:16 60fps तक जा सकती है। Official shooting table यही कारण है कि “resolution” को अकेले देखकर mode चुनना गलत है। [1]
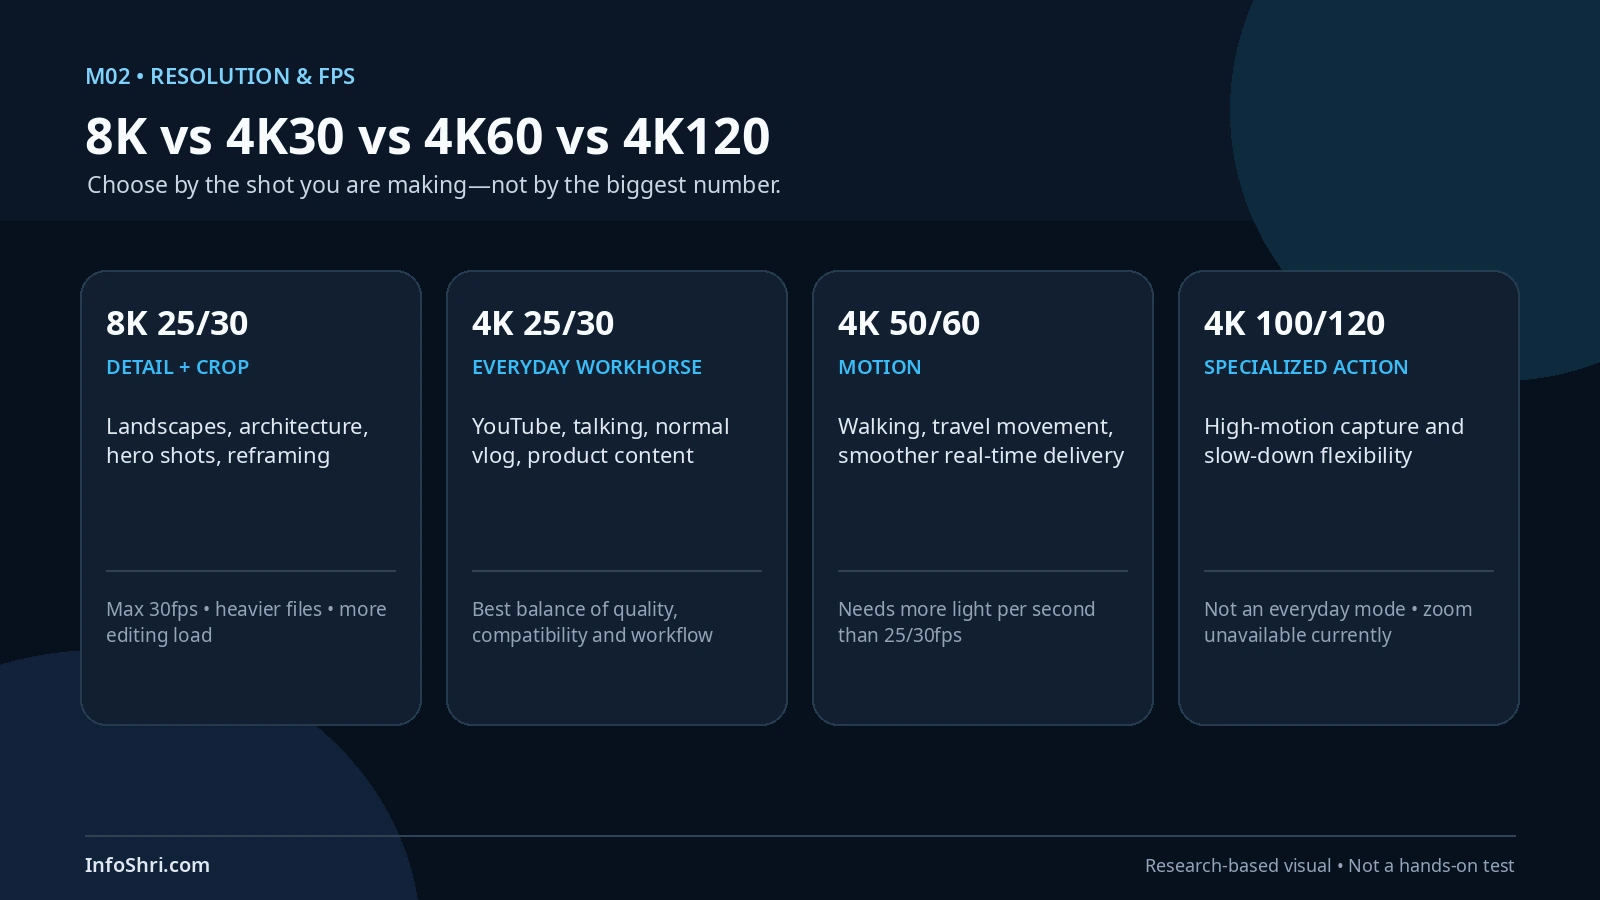
8K का सही use-case maximum source detail है। Landscape, architecture, important establishing shot, static product detail, wide master shot जिसे edit में crop/reframe करना हो—इनमें 8K useful हो सकती है। अगर 8K frame को 4K timeline में deliver कर रहे हैं, आपके पास crop या digital reframing की extra room होती है। Independent Luna Pro testing में भी 8K को crop flexibility के लिए useful माना गया, जबकि सामान्य YouTube workflow में 4K अक्सर पर्याप्त पाया गया। [5]
लेकिन 8K की कीमत है। Files भारी होती हैं, editing hardware पर load बढ़ता है, high frame rate नहीं मिलता, filters support नहीं करते, और extended 8K recording में at least one current independent review ने overheating report की। [6] इसलिए full-day travel vlog को बस इसलिए 8K में shoot करना कि camera कर सकती है, practical नहीं।
अगर आप “set it and forget it” quality चाहते हैं, 4K25/30 सबसे sensible workhorse है। यह enough detail देती है, 8K से lighter workflow रखती है और camera के कई processing/features के साथ broad compatibility देती है। TechRadar और अन्य current independent reviews भी 4K को everyday use में ज्यादा practical बताते हैं। [7]
24, 25 और 30fps को quality ranking मत समझिए। 24fps traditional cinema cadence है; 25fps 50Hz-region workflows में practical हो सकती है; 30fps online/digital delivery में बहुत common है। 24fps “professional” और 30fps “amateur” नहीं है। Motion blur, shutter, camera movement और final delivery look को ज्यादा प्रभावित करते हैं।
अगर final video 25fps है और आप normal speech/vlog shoot कर रहे हैं, 25fps simple choice है। अगर आपकी editing/timeline 30fps है, 30fps आसान है। अगर artificial lighting में flicker दिख रही है, India में 25fps + 1/50 को test करना reasonable है।
4K50/60 तब useful होती है जब subject/camera movement ज्यादा है: walking vlog, travel movement, kids/pets, street action, handheld pans या वह content जहाँ 50/60fps final delivery चाहिए। यह 25/30 की तुलना में movement को अधिक temporal samples देती है। अगर 60fps capture को 30fps timeline पर conform करें तो theoretical 2× slow-down मिल सकती है; 50→25 भी 2× है। लेकिन exact editing interpretation आपके NLE और file metadata पर depend करेगी।
High fps का downside light है। Natural-looking shutter convention follow करने पर 60fps के आसपास 1/120 और 50fps के आसपास 1/100 जैसी faster shutter values आती हैं, यानी हर frame को कम exposure time मिलता है। Bright daylight में यह समस्या नहीं हो सकती, लेकिन रात के market या dim restaurant में 60fps सिर्फ “number बड़ा है” इसलिए select करना noise/underexposure या processing demand बढ़ा सकता है।
4K100/120 को everyday setting नहीं बनाइए। इसका मुख्य benefit high-motion capture और slow-down flexibility है। Official Luna Pro table normal Video में भी 4K100/120 list करती है और dedicated Slow-Mo mode में भी 4K100/120 list करती है। यह unusual overlap है। Current public official documentation दोनों के exact playback interpretation, audio handling और metadata difference को एक clear comparison table में explain नहीं करती। इसलिए article इन्हें identical नहीं मानता। [1]
Practical rule: अगर आपका goal explicitly slow-motion clip है, Dedicated Slow-Mo mode safer workflow choice है। अगर आप normal Video में 4K100/120 capture करना चाहते हैं, पहले 5–10 second test clip record करके अपने editing software में frame rate, audio और playback interpretation verify कर लें। Normal Video 4K100/120 में official zoom table के अनुसार zoom supported नहीं है। [1]
Extreme temporal slow motion के लिए 1080p200/240 भी available है। 240fps को 30fps timeline पर interpret करने से 8× slow-down की potential बनती है; 120→30 से 4× और 100→25 से 4×। लेकिन higher fps के साथ resolution और light budget sacrifice होता है। Sports/action में यह useful है; talking head में नहीं।
एक और hidden point: bitrate documentation अभी internally conflict कर रही है। Current Luna Series specifications table 150Mbps maximum video bitrate दिखाती है, जबकि Insta360 की current Luna Pro File Format FAQ 120Mbps maximum कहती है। [1][8] इसलिए storage planning में “हर mode exactly X Mbps” जैसी fixed assumption न बनाएं। Actual file bitrate resolution, fps, scene complexity और firmware से बदल सकती है। यही reason है कि storage calculator को estimate समझना चाहिए, guarantee नहीं।
Bottom line:
4K25/30 = general workhorse.
4K50/60 = movement / smoother delivery.
8K25/30 = detail/crop when it genuinely matters.
4K100/120 = specialized high-motion/slow-motion capture.
1080p200/240 = extreme slow motion where temporal detail resolution से ज्यादा important है।
Daylight, YouTube और Vlogging के लिए Best Everyday Setup क्या हो?
अगर आप पहली बार Luna Pro लेकर बाहर निकल रहे हैं, तो 8K भूल जाइए। पहले ऐसी setup चुनिए जो आपको shot miss न करवाए।
Normal handheld YouTube vlog के लिए research-based starting point है: Video 4K25/30, Standard color, Auto या semi-auto exposure, AWB, AF-C, Roll Lock, Medium follow speed। Speech priority हो तो built-in microphones के साथ Voice Enhancement + Front test करें। Official audio docs Voice Enhancement को vlog voice के लिए और Front direction को lens के सामने subject/creator voice के लिए describe करती हैं। [9][10]
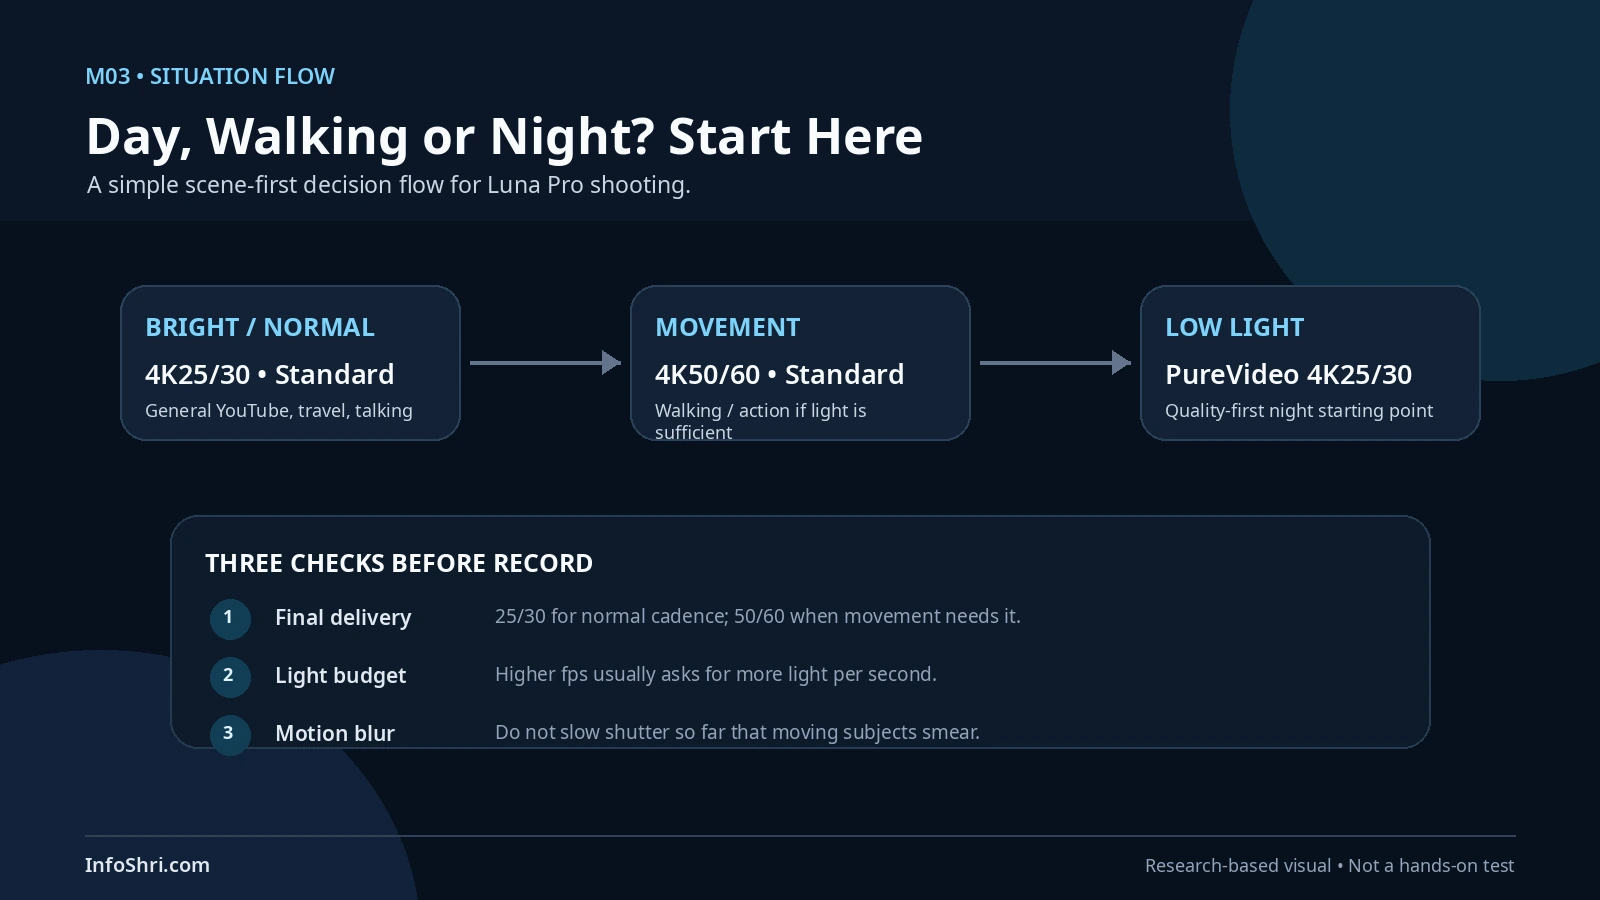
यह setup “beginner compromise” नहीं है। Changing environment में Auto exposure genuinely smarter हो सकती है क्योंकि walking vlog में आप shade से sunlight, indoor से outdoor या market से street में जाते रहते हैं। Manual exposure को पकड़कर रखने से brightness consistent रह सकती है, लेकिन scene बदलते ही वही fixed shutter/ISO गलत हो सकती है। Professional control का मतलब manual हर समय नहीं; professional control का मतलब वह automation use करना जो shot बचाए।
AWB भी इसी logic से समझिए। Travel vlog में environment continuously बदल रही है तो AWB convenience देती है। Controlled talking-head, product review या multi-take shoot में fixed WB better consistency दे सकती है, क्योंकि हर clip में color temperature drift नहीं होगा। “AWB amateur है” कहना गलत है।
Focus में AF-C default इसलिए useful है क्योंकि आप lens से distance बदल सकते हैं। AF-S static shot में useful हो सकती है जहाँ focus lock behavior चाहिए। Product Showcase तब use करें जब आप camera के सामने gadget, cosmetic, food item या phone लाकर focus को object पर shift कराना चाहते हैं। Official touchscreen/pro documentation इन तीनों focus modes को Luna Pro के current options के रूप में list करती है। [11]
Walking vlog में 4K50/60 select करने का reason सिर्फ “smooth” look नहीं है। जब camera और subject दोनों move करते हैं, temporal resolution बढ़ती है। लेकिन इसका मतलब यह नहीं कि 4K60 हमेशा best vlog mode है। Bright day और movement-heavy content में excellent starting point हो सकती है; sunset, indoor या night में 4K25/30 आपको exposure के लिए ज्यादा breathing room दे सकती है।
Gimbal को भी spec नहीं, motion से चुनिए। Official Luna Series page Roll Lock को default और vlogging/selfie/daily shooting के लिए suitable बताती है। Medium follow speed everyday balance है। Slow follow speed controlled pan/reveal में smoother feel दे सकती है। Fast follow speed तब useful है जब subject direction तेजी से बदलता है और camera को तुरंत respond करना है। [12]
Luna Pro में सिर्फ Roll Lock और Roll & Tilt Lock ही नहीं, Omnidirectional Follow/FPV family और Lock behavior भी documented हैं। लेकिन everyday vlog में इन creative modes की जरूरत नहीं। Beginner को सबसे पहले Roll Lock समझना चाहिए: horizon level रहता है और camera आपके pan/tilt movement को follow करती है। Roll & Tilt Lock tilt को fixed रखने वाले controlled push/pull या lateral move में useful है। FPV creative rotation के लिए है; normal face vlog के लिए default नहीं।
Tracking कब enable करें? अगर camera आपके हाथ में है और आप framing खुद कर रहे हैं, tracking हर समय जरूरी नहीं। अगर camera tripod/table पर रखी है और आप frame में move करेंगे, tracking Luna Pro का major advantage बनती है। Official tracking docs people, pets और objects support करती हैं, group tracking में up to eight people का current support बताती हैं, और Photo, Video, PureVideo, Slow-Mo, Live Photo तथा कुछ अन्य supported modes में tracking available बताती हैं। Timelapse और Pano जैसे modes में tracking supported नहीं है। [13]
Independent reviewers ने Luna Pro tracking और stabilization को strong पाया है, लेकिन physical gimbal range और real-world occlusion जैसी limits रहती हैं। [5][7] इसलिए solo creator के लिए best practice है: recording से पहले 10-second rehearsal। Frame के left/right edge तक चलकर देखें, subject briefly बाहर जाए तो reacquisition check करें, और background में दूसरे faces हों तो selected subject lock verify करें।
Zoom में 1× को default रखें। Luna Pro एक single physical lens camera है। Official table 4K≤60 landscape में 1×–4× और 2× Clarity Zoom support दिखाती है; 8K में 1×–3×; portrait 4K≤30 में 1×–3×; 4K100/120 में zoom नहीं। [1] Independent review evidence 2× तक quality को useful/strong बताता है, जबकि 2× के बाद digital softness ज्यादा visible हो सकती है। [7]
इसलिए अगर आप physically camera को थोड़ा पास ला सकते हैं तो 1× safest quality choice है। 2× Clarity Zoom composition के लिए genuinely useful है—product detail, face tighter framing, architecture crop—but इसे optical telephoto मत समझिए। 3×/4× convenience zoom है; इसे “lossless” तब तक न कहें जब तक specific current official documentation उस exact mode के लिए ऐसा न कहे।
Audio में भी context बदलता है। Voice Enhancement background noise कम करके voice को highlight करती है; Wind Reduction travel/outdoor wind के लिए; Original Audio music/ambient fidelity के लिए। Sound Direction में Front vlog/subject voice, Front & Rear interview/creator-behind-camera + subject-ahead, और Omni ambient/multi-person situation के लिए documented हैं। [9][10]
अगर content important है, built-in processing से पहले microphone placement सोचिए। External mic connect होने पर Luna Series documentation external source को priority देती है। इसलिए serious interview/talking-head में clean external mic अक्सर “8K vs 4K” से ज्यादा बड़ा quality upgrade होगा।
Night और Low Light में Settings पूरी तरह क्यों बदलती हैं?
रात में सबसे common गलती है daytime recipe को वही रख देना और सिर्फ ISO बढ़ा देना। Low light में resolution से पहले frame rate, shutter, movement और processing mode important हो जाते हैं।
Luna Pro का dedicated low-light mode PureVideo है। Current official table landscape में PureVideo 4K 24/25/30/48/50/60fps तक और portrait में 3K 9:16 up to 60fps list करती है। PureVideo में 8K नहीं है और 4K vertical PureVideo current table में नहीं है। [1]
Quality-first night starting point के लिए PureVideo 4K25/30 sensible है। 25/30fps में, 50/60fps की तुलना में natural shutter convention पर हर frame को ज्यादा exposure time मिल सकती है। इससे camera को unnecessary ISO gain push करने की जरूरत कम हो सकती है। इसका मतलब यह नहीं कि “night में 30fps हमेशा जीतती है।” अगर आप चल रहे हैं, subject fast है या motion clarity ज्यादा important है, PureVideo 4K50/60 useful हो सकती है—बस light demand बढ़ेगी।
Independent Luna Pro review evidence PureVideo को after-dark cleaner/better-controlled बताती है और practical low-light test में PureVideo को Standard की तुलना में cleaner/brighter देखा गया है, हालांकि processing fine detail को थोड़ा soften कर सकती है। [14][15] इसे miracle mode नहीं समझना चाहिए। Very dark scene जहाँ usable light ही नहीं है, वहाँ कोई processing physical photons create नहीं कर सकती।
एक बहुत important current feature है Low-Light Enhancement। Insta360 के official docs के अनुसार normal Video mode में recording शुरू करते समय camera ambient light insufficient पाए तो Low-Light Enhancement automatically enable कर सकती है। इसे currently manually disable नहीं किया जा सकता। Same settings पर manufacturer कहता है imaging result essentially PureVideo जैसा है, लेकिन Low-Light Enhancement थोड़ी ज्यादा power consume कर सकती है। यह recording के बीच light बदलने पर on/off नहीं होती; start moment की condition के आधार पर state तय होती है। [2]
इससे practical lesson निकलता है: “Night = PureVideo only” rule oversimplified है। अगर आप Standard Video workflow चाहते हैं लेकिन scene low-light है, camera background में enhancement लगा सकती है। फिर भी dedicated PureVideo चुनना useful है जब आप consciously low-light workflow में रहना चाहते हैं और mode availability साफ रखना चाहते हैं।
Shutter रात में critical है। Luna Pro Pro mode में video shutter 1/8000 से लेकर 1/2 second तक technically support करती है—Pro model के लिए long-exposure video capability specifically documented है। [11] लेकिन 1/2 second option मौजूद होने का मतलब यह नहीं कि walking vlog 1/2 sec पर shoot करें। हर moving subject ghost/blur बन जाएगा।
Natural motion के लिए common starting convention roughly:
24fps → 1/48 या nearest practical
25fps → 1/50
30fps → 1/60
50fps → 1/100
60fps → 1/120
100fps → 1/200
120fps → 1/240
यह कानून नहीं है। Sports में faster shutter useful हो सकती है। Night में slightly slower shutter usable exposure दे सकती है, लेकिन movement blur बढ़ेगा। अगर आपको face crisp चाहिए, shutter इतना slow मत करें कि movement smear हो जाए।
ISO के बारे में सबसे dangerous “magic number” advice है—“ISO 800 से ऊपर मत जाओ” या “1600 max।” Official range 100–6400 है, लेकिन range quality threshold नहीं बताती। [1] बिना matched Luna Pro test के universal ceiling invent करना गलत होगा। Better approach: exposure meter और image देखकर ISO उतना ही बढ़ाएं जितना scene को चाहिए; noise vs motion blur trade-off देखें। अगर subject static है तो slower shutter ISO बचा सकती है; अगर subject चल रहा है तो higher ISO स्वीकारना blur से बेहतर हो सकता है।
Night vlog में focus और tracking भी harder हो जाते हैं। Official tracking docs acknowledge करती हैं कि very low light, occlusion और rapid movement tracking performance को affect कर सकते हैं। [13] इसलिए neon market में tracking icon देखकर assume न करें कि subject हमेशा locked रहेगा। एक short rehearsal shot करें।
Night vertical content में limitation याद रखें: PureVideo vertical 3K up to 60fps है, 4K नहीं। अगर Reel रात में shoot करनी है और low-light processing priority है, 3K vertical PureVideo practical हो सकती है। अगर maximum vertical resolution priority है और light पर्याप्त है, native 4K 9:16 25/30fps use करें।
I-Log और PureVideo simultaneously नहीं चलते। Official I-Log docs explicitly PureVideo, Beauty, Dolby Vision और Adjust को I-Log के साथ unavailable बताती हैं। [16] इसलिए low-light creator को decision लेना है: processed low-light cleanliness चाहिए या log grading flexibility। दोनों एक साथ नहीं।
Reels & YouTube Shorts में 4K30, 3K60 और Horizontal Crop में क्या चुनें?
Luna Pro social creator के लिए unusual advantage देती है: normal Video mode में native 4K 9:16 at 24/25/30fps। Current independent coverage ने भी Luna Pro की 4K vertical output को key differentiator माना है। [1][17]
Talking Reel, beauty, food, product detail, static educational short या face-to-camera clip में 4K 9:16 25/30fps सबसे logical starting point है। आपको native vertical framing मिलती है और edit में horizontal crop बनाने की जरूरत नहीं।
लेकिन dance, fitness, running, fast hand movement या dynamic street content में 30fps motion feel आपका goal पूरा न करे। Luna Pro की 3K 9:16 mode 60fps तक जाती है। यहाँ decision “4K vs 3K कौन better है?” नहीं; “detail vs motion कौन ज्यादा important है?” है।
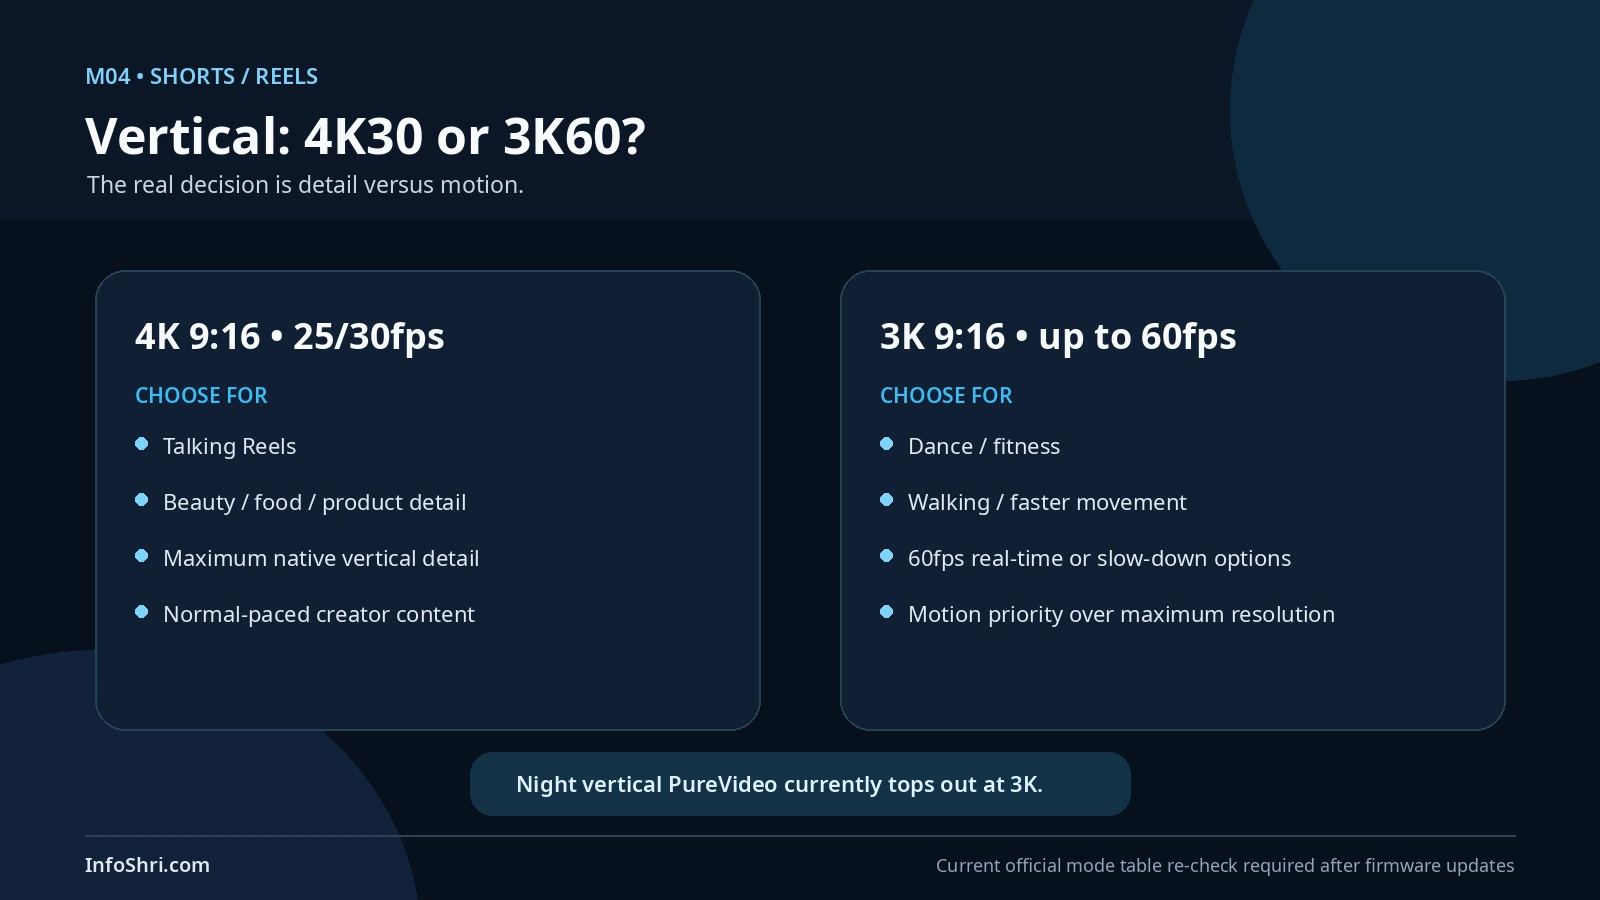
अगर आपकी delivery 30fps है और आप 3K60 capture करते हैं, selected moments को 2× slow-down करने की flexibility मिलती है। अगर real-time 60fps Reel/Short deliver करना है, platform/support workflow check करें। Social apps re-encode करती हैं; camera master resolution और platform final compression अलग चीजें हैं।
Night Shorts में PureVideo vertical 3K तक सीमित है। इसलिए 4K badge के पीछे भागकर low-light processing lose करना जरूरी नहीं। अगर street lighting weak है, 3K PureVideo 25/30 या 50/60 depending motion ज्यादा useful हो सकती है।
एक third strategy है horizontal 8K/4K master से vertical crop। यह तब useful है जब same scene से long-form YouTube और Shorts दोनों चाहिए। 8K wide master में crop room ज्यादा है, पर composition को शुरू से safe बनाना होगा। Subject center में बहुत tight रखा तो horizontal अच्छा लगेगा लेकिन vertical crop awkward हो सकती है; ultra-wide framing में vertical output में subject छोटा हो सकता है।
Solo creator के लिए planning rule:
- Shorts-first shoot: native vertical.
- Long-form-first shoot: horizontal 4K/8K master, vertical-safe composition.
- Same moment दोनों formats में critical है: shot दो बार capture करना अक्सर crop compromise से बेहतर है।
- Night social: 3K vertical PureVideo को seriously consider करें।
- Dance/fitness: 3K60 vertical.
- Talking/product: 4K30 vertical.
4K120 vertical claim से बचें। Luna Pro current official table में 4K 9:16 केवल 24/25/30fps है। 3K 9:16 60fps तक है। [1]
Tracking vertical workflow में useful है, खासकर fitness/dance या solo tripod content में। Official docs group tracking up to eight persons बताती हैं, लेकिन crowd में composition अलग issue है—camera technically track करे तो भी frame aesthetically अच्छा हो यह guaranteed नहीं। Smart Framing और manual composition controls को actual rehearsal में verify करें।
Gimbal follow speed भी vertical में storytelling बदलती है। Slow movement beauty/product reveal में Slow useful हो सकता है; dance में Medium/Fast subject के साथ responsive रहेगा। Fast को default मत करें—छोटे joystick/handle movement भी frame को nervous बना सकते हैं।
Audio में social platform का type देखें। Talking Reel में Voice Enhancement + Front, outdoor Short में Wind Reduction, dance/music ambience में Original Audio + Omni more natural starting point हो सकता है। अगर music बाद में overlay होगी, on-camera audio सिर्फ sync/reference हो सकती है; तब processing choice critical नहीं।
Travel, Product Video, Talking Head और Fast Action में Settings कैसे बदलें?
एक ही camera अलग jobs करती है, लेकिन best setting job के हिसाब से बदलती है। Travel day को studio product shoot की तरह चलाना उतना ही गलत है जितना controlled product video को full Auto पर छोड़ देना।
Travel day: सुबह bright street में 4K25/30 Standard से शुरू करें। Walking sequence में 4K50/60 switch करें अगर smoother motion चाहिए। Landmark, architecture या वह view जिसे बाद में crop करना है, वहाँ selected 8K25/30 hero shot लें। Night में PureVideo या low-light-enhanced Video workflow पर जाएँ। पूरे दिन 8K चलाने की जरूरत नहीं; 8K file size, editing load और thermal demand बढ़ाती है।
Travel में AWB practical है क्योंकि light लगातार बदलती है। लेकिन sunrise/sunset या controlled scenic sequence जहाँ multiple clips match करनी हैं, fixed WB useful हो सकती है। Exposure में Auto या shutter-priority-like semi-manual logic shot बचाती है; ND filter और manual exposure तभी जब आप workflow consciously manage करना चाहते हों।
Audio travel में scene-driven होना चाहिए। Walking commentary में Voice Enhancement, windy lookout में Wind Reduction, temple bells/street ambience/market atmosphere में Original Audio + Omni better starting point हो सकती है। Wind Reduction ambience का character बदल सकती है, इसलिए “on forever” न रखें।
Product review / unboxing: यहाँ 4K25/30, controlled lighting, fixed WB और Product Showcase focus एक strong starting recipe है। Product Showcase का purpose camera के सामने brought object को prioritize करना है; यह tech review, beauty product और food demo में useful है। [11] लेकिन हर close-up में इसे on न रखें। अगर camera fixed product detail shoot कर रही है और subject नहीं बदल रहा, AF-S या AF-C का controlled use cleaner हो सकता है।
Breathing Compensation focus transition में apparent field-of-view change कम करने के लिए documented है। Product foreground-to-face transition में useful हो सकती है, लेकिन crop/side effects और mode availability check करें। [11] इसे blind default न बनाएं।
2× Clarity Zoom gadget detail में useful है, क्योंकि 4K≤60 landscape में official support है। 3×/4× भी available हो सकती है, लेकिन quality gradually digital crop पर depend करती है। Independent review testing में 2× तक result strong था और उसके आगे softness more visible। [7]
Talking head: camera tripod पर locked है तो 4K25/30, fixed WB, controlled exposure, AF-C/Face Priority और simple gimbal/lock framing रखें। Tracking तभी जब speaker frame में significantly move करे। Camera stationary है और speaker chair पर है तो aggressive tracking unnecessary movement create कर सकती है।
Face Priority metering face brightness को prioritize करती है; Matrix overall scene evaluate करती है। Official docs इनमें guarantee नहीं देती। Backlit window में Face Priority sky clip कर सकती है; Matrix face dark छोड़ सकती है। इसलिए waveform/histogram-like exposure aid चाहिए तो official docs के अनुसार camera body में histogram currently नहीं है, लेकिन connected Insta360 app में histogram enable किया जा सकता है। [11]
Interview: external microphone का impact resolution change से बड़ा हो सकता है। Front & Rear sound direction तब useful है जब camera के पीछे interviewer और सामने subject दोनों हों। Fixed WB multiple takes को consistent रखेगी। 8K का use तभी करें जब crop/reframe या high-detail master जरूरी हो।
Food: Luna Pro की current independent/official product information करीब 9cm close focusing capability बताती है। [6] Product Showcase और good light small dish/product detail में useful हैं। White balance खास important है, क्योंकि food color गलत हुआ तो footage technically sharp होकर भी unappealing लगेगी।
Fast action: 4K50/60 normal-speed action के लिए sweet spot हो सकती है। 4K100/120 slow-motion/high temporal detail के लिए। 4K100/120 में zoom officially unavailable है, इसलिए framing पहले set करें। Tracking official support Slow-Mo में भी listed है, लेकिन fast motion + gimbal mechanical limits के कारण real rehearsal जरूरी है। [13]
Slow motion: dedicated Slow-Mo 4K100/120 या 1080p200/240 choose करें। 100fps 25fps timeline में 4×, 120fps 30fps timeline में 4× potential slow-down देता है। 200→25 और 240→30 roughly 8× potential है। “Potential” इसलिए क्योंकि recording/playback metadata और NLE interpretation verify करनी होगी।
Timelapse: stationary camera, sunset, clouds, city traffic from fixed point.
TimeShift: moving hyperlapse-style sequence, walk/drive motion.
इन modes को normal Video high fps के साथ confuse न करें।
Exposure, Focus, Gimbal और Audio—इन चार Settings से Footage सबसे ज्यादा कैसे सुधरेगी?
Resolution marketing headline है; exposure, focus, movement और sound अक्सर actual viewer experience decide करते हैं।
Exposure में first priority है usable highlights + usable subject। Completely clipped sky recover नहीं होगी; severely underexposed face को post में उठाने पर noise बढ़ेगी। Auto exposure changing vlog में useful है। Manual exposure controlled studio में useful है। Semi-manual—जैसे shutter intentional रखना और बाकी camera को adjust करने देना—middle ground हो सकती है, अगर current UI उस parameter combination को allow करे।
180-degree shutter concept को law न बनाएं। यह motion blur के लिए common starting convention है, guarantee नहीं। अगर 25fps indoor India shoot में 1/50 clean दिख रहा है तो अच्छा। अगर LED flicker banding है, shutter को थोड़ा adjust करना पड़ सकता है। अगर sports crisp चाहिए तो faster shutter। अगर dark static shot है तो slower shutter। Creative intent rule से ज्यादा important है।
EV compensation तब use करें जब Auto exposure consistently scene को too bright/dark बना रही हो। “हर Luna Pro user EV -0.7” जैसी advice का कोई reliable basis नहीं मिला। Bright sky + face situation में negative EV highlights बचा सकती है लेकिन face dark हो सकती है; Face Priority opposite behavior ला सकती है। Monitor देखकर decide करें।
White Balance में AWB convenience vs fixed-WB consistency trade-off है। Travel में AWB; studio/product/interview में fixed Kelvin or fixed preset. Official range 2000K–10000K है, लेकिन range recommendation नहीं। [1] 5600K daylight magic number नहीं; actual light source measure/preview करें।
Focus में AF-C moving creator के लिए, AF-S static subject के लिए, Product Showcase hand-to-camera object demo के लिए। Product Showcase को general macro button न मानें। अगर product table पर static है, AF-S/AF-C whichever transition behavior आपको चाहिए वह better हो सकता है।
Breathing Compensation focus pull में frame size shift कम करती है, इसलिए product demo में useful। लेकिन हर scene में crop/processing trade-off accept करने की जरूरत नहीं।
Gimbal में Roll Lock everyday default है। Medium follow most general balance। Slow cinematic pan/reveal। Fast sports/rapid reframing। Roll & Tilt Lock fixed tilt creative movement। FPV/Omnidirectional creative shot के लिए। Lock orientation तब जब camera direction को handle movement से independent रखना है। [12]
याद रखें: 3-axis mechanical gimbal vertical walking bounce को magic से erase नहीं कर सकती। Steps smooth रखें, knees slightly soft, camera body को wildly up-down न करें। Tracking + gimbal frame follow कर सकते हैं; वे operator movement physics खत्म नहीं करते।
Audio में तीन layers सोचिए: processing mode, direction, microphone placement। Built-in four-mic array और detachable-screen mic useful हैं, लेकिन distance बढ़ने पर room/street noise physics लागू रहती है। External mic available हो तो serious speech में उसे priority दें। [9]
Speech vlog: Voice Enhancement + Front.
Windy travel: Wind Reduction; direction scene-based.
Music/ambience: Original Audio + Omni.
Interview: Front & Rear useful हो सकता है।
Creator पीछे camera + subject आगे: Front & Rear.
Camera subject की तरफ और creator सामने: Front.
Voice Enhancement background हटाकर voice clearer बना सकती है, लेकिन ambience/tone बदल सकती है। Wind Reduction wind suppression के बदले sound character बदल सकती है। Original Audio most “processed-free” starting direction है, लेकिन noisy street में speech clarity कम हो सकती है।
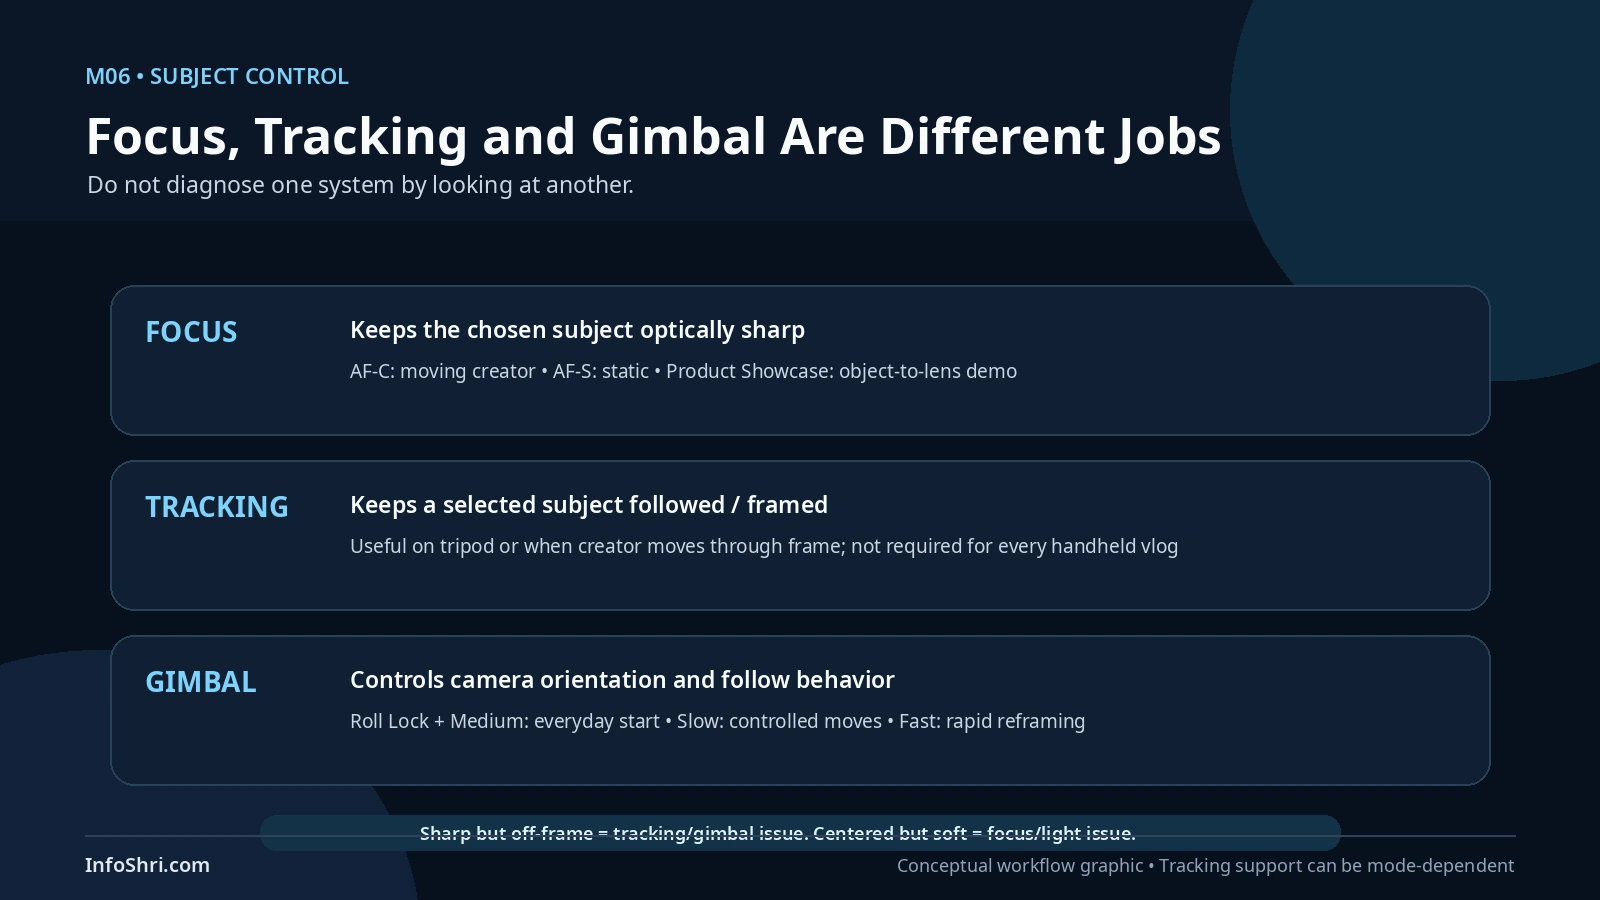
Tracking को focus से अलग समझिए। Focus optical sharpness maintain करती है; tracking gimbal/composition subject follow करती है। Camera subject track कर रही है लेकिन focus wrong हो सकता है, या focus correct है लेकिन gimbal subject frame से lose कर सकती है। दोनों systems का short real-world test करें।
अगर footage में problem आए तो पूरी camera setup एक साथ मत बदलें। एक experienced operator की तरह one-variable-at-a-time test करें। पहले resolution/fps fix रखें, फिर exposure देखें; exposure ठीक हो तो focus; focus ठीक हो तो gimbal; उसके बाद tracking और audio processing। अगर आप एक साथ 4K30 से 4K60, Standard से I-Log, Auto से Manual, AF-C से Product Showcase और Medium से Fast follow बदल देंगे, तो improvement या problem का कारण पता नहीं चलेगा।
India में indoor flicker troubleshoot करने का practical तरीका भी यही है। मान लीजिए 30fps पर LED tube के नीचे horizontal bands दिख रही हैं। पहले 25fps + लगभग 1/50 shutter का छोटा test लें। फिर 50fps + लगभग 1/100। अगर दोनों में flicker बचती है, इसका मतलब केवल mains frequency match करना पर्याप्त नहीं—LED driver/PWM अलग behavior दे रहा है। तब shutter को छोटे increments में बदलकर monitor करें। Outdoor daylight में वही issue गायब हो सकता है। इसलिए “India = हमेशा 25fps” rule गलत है; सही rule है artificial light को test करें और final delivery को साथ रखें।
Exposure evaluate करते समय camera screen की brightness पर blind भरोसा भी न करें। Screen outdoor sunlight में बहुत bright/too dim feel हो सकती है। अगर controlled shoot है, connected app का histogram उपयोग करना helpful है क्योंकि official documentation camera body पर in-camera histogram को currently unavailable बताती है, जबकि app में histogram view किया जा सकता है। इसका use यह देखने के लिए करें कि highlights लगातार edge पर crush तो नहीं हो रही और exposure सिर्फ display brightness के कारण misleading तो नहीं लग रही।
Focus problem diagnose करने का भी sequence रखें। Face vlog में AF-C hunting कर रही है तो पहले देखें कि face frame में पर्याप्त बड़ा और contrast वाला है या नहीं; फिर background बहुत busy तो नहीं; फिर Product Showcase accidentally enabled तो नहीं। Product review में object camera के बहुत पास लाते समय focus transition खराब है तो Product Showcase test करें। Static tabletop shot में repeated refocusing distracting है तो AF-S useful हो सकती है। Focus mode की recommendation subject behavior से निकलनी चाहिए, “AF-C modern है इसलिए हमेशा best” से नहीं।
Tracking failure को focus failure न समझें। अगर subject sharp है लेकिन frame से बाहर चला गया, gimbal/tracking issue है। अगर gimbal subject को center में रख रही है लेकिन face soft है, autofocus/exposure/light issue हो सकता है। अगर subject briefly pillar के पीछे गया और camera ने दूसरे person को पकड़ लिया, यह reacquisition/scene complexity problem है। Official tracking support broad है, लेकिन independent reviews भी physical gimbal range और real-world tracking limits दिखाते हैं; इसलिए critical solo take से पहले path rehearsal बहुत valuable है।
Gimbal tune करने में भी “Fast = responsive = better” shortcut avoid करें। Fast follow sports या अचानक direction बदलते subject में useful है, पर slow walking vlog में micro hand movements भी visible pan बना सकती हैं। Slow follow cinematic reveal में सुंदर हो सकती है, पर तेजी से turn करने पर subject frame से निकल सकता है। Medium इसलिए strong everyday starting point है क्योंकि responsiveness और smoothness के बीच compromise देता है। अगर shot खराब लग रही है, पहले follow speed बदलें; resolution बदलने से gimbal behavior ठीक नहीं होगा।
Audio troubleshoot करते समय processing mode और direction अलग-अलग test करें। Voice Enhancement + Front speech के लिए logical है, लेकिन अगर creator camera के पीछे और subject सामने है, Front & Rear ज्यादा sensible हो सकती है। Market ambience capture करनी है तो Voice Enhancement उस ambience को दबा सकती है; Original Audio + Omni better story दे सकता है। Wind Reduction हवा में useful है, लेकिन indoor room tone पर उसे default रखना जरूरी नहीं। सबसे अच्छा तरीका है same 10-second line तीन modes में record करके headphones पर compare करना।
Low light में अगर face noisy है, सिर्फ ISO blame न करें। पहले देखें frame rate unnecessary high तो नहीं; shutter जरूरत से तेज तो नहीं; face पर कोई usable light है या नहीं; subject बहुत move कर रहा है या नहीं; PureVideo/Low-Light Enhancement active है या नहीं। 60fps से 30fps पर जाना कभी-कभी एक expensive light खरीदने से पहले ही exposure budget improve कर सकता है। लेकिन moving subject blur बढ़े तो फिर light add करना या higher ISO स्वीकारना बेहतर हो सकता है।
इसी तरह daylight में overexposure हो तो ISO 100 set करना हमेशा complete solution नहीं। Wide aperture lens bright sun में shutter बहुत fast जा सकती है, जिससे motion crisp/staccato दिखे। अगर natural motion blur maintain करना है तो ND filter practical tool बनता है। इस guide ने Luna Pro के लिए universal ND strength prescribe नहीं की क्योंकि required density light, fps और shutter target पर depend करती है। Bright noon, cloudy day और golden hour में same ND value नहीं चलेगी।
एक creator के लिए सबसे useful habit है three-test-clip rule: नई situation में 10–15 seconds के तीन clips लें—safe default, motion/light-adjusted alternative, और एक creative option। उदाहरण: night market में PureVideo 4K25, PureVideo 4K50, और Standard Video 4K25. घर लौटकर 40 minutes की गलत footage discover करने से better है location पर 45 seconds test करना।
Standard, I-Log, Dolby Vision, Filters और Beauty—कौन-सा कब Use करें?
“Pro” menu में जाना footage को automatically professional नहीं बनाता।
Standard most creators के लिए सबसे practical default है। Current file-format specs Luna Series video को 10-bit list करती हैं, इसलिए “10-bit चाहिए तो I-Log जरूरी है” statement गलत होगा। [8] Standard ready-to-use look, fast edit और broad delivery compatibility देता है। YouTube vlog, travel, family, quick product videos और fast turnaround में यह अक्सर best choice है।
I-Log तब use करें जब आप वास्तव में color grade करेंगे। Official Luna Series I-Log documentation 10-bit I-Log और manufacturer-claimed 14 stops dynamic range बताती है; I-Log media Rec.2020 color space workflow में है और DaVinci Resolve integration documented है। [16] यह extra latitude का workflow है, automatic “better image” switch नहीं।
I-Log on करने पर Adjust, Beauty, Dolby Vision और PureVideo simultaneously available नहीं हैं। Filters I-Log पर apply की जा सकती हैं, लेकिन effect file में baked हो जाएगी; flat I-Log चाहिए तो filter मत लगाएं। [16][18]
एक critical uncertainty: current public I-Log support article “video modes” कहती है लेकिन Luna Pro के लिए हर resolution/fps combination की explicit per-mode matrix publish नहीं करती। इसलिए इस guide ने “8K I-Log निश्चित”, “4K120 I-Log निश्चित” या “vertical I-Log निश्चित” जैसी blanket claims नहीं की हैं। Professional recipe के लिए conservative 4K25/30 I-Log starting point use करें only if current camera menu उस exact combination में I-Log offer करे। Firmware बदलने पर selector खुद final authority होगा।
Dolby Vision intentional HDR workflow के लिए है। Playback/edit/delivery chain HDR-compatible होनी चाहिए। अगर आपका editor, monitor, upload platform या client SDR workflow में है तो Dolby badge benefit के बजाय complication बन सकता है। Current Pro interface Standard, Dolby Vision और I-Log color modes list करती है। [11] Beauty और in-camera filters के कुछ combinations Dolby Vision में unsupported हैं। [18][19]
Filters fast baked look के लिए useful हैं। Current official filter list में Leica Natural, Leica Vivid, Leica Chrome और कई cinematic-style filters हैं। Luna Pro में filters Video up to 4K60, PureVideo up to 4K30 और I-Log में supported हैं; 8K, high-frame-rate Video और Dolby Vision में supported नहीं। Luna Pro Beauty + Filter simultaneously support करती है। [18]
Filter “cinematic” नाम का है इसलिए dynamic range, story, lighting या composition cinematic नहीं हो जाती। Look सिर्फ color treatment है।
Beauty quick face content में useful हो सकती है, लेकिन default aggressive smoothing avoid करें। Current support Video up to 4K60 और PureVideo up to 4K30 में है; 8K/high-frame-rate, Dolby Vision और I-Log में नहीं। [19] Skin texture को preserve करना usually safer starting point है।
Sharpness, contrast, saturation जैसे Adjust controls में DJI/Sony/GoPro की copied “-2/-2/+1” recipe use न करें। Luna Pro-specific matched testing के बिना exact magic values invent करने का कोई कारण नहीं। अगर आप Standard में fast-turnaround content बना रहे हैं, default/minimal adjustment से शुरू करें और controlled test chart/face shot पर changes compare करें।
Pro workflow का simple decision:
- Edit जल्दी चाहिए → Standard.
- HDR deliver करना है और chain compatible है → Dolby Vision.
- Serious grading करनी है → I-Log.
- Night processing priority → PureVideo / low-light-enhanced Video.
- Baked look चाहिए → supported filter.
- Quick face smoothing intentionally चाहिए → supported Beauty level, lightly.
Color mode choose करने से पहले feature-compatibility check की habit बनाइए। Luna Pro में कई features mode-dependent हैं। 8K select करते ही filters जैसी चीजें unavailable हो सकती हैं। High-frame-rate Video में filters/Beauty नहीं मिलतीं। I-Log में PureVideo, Beauty, Dolby Vision और Adjust साथ नहीं चलते। 4K100/120 पर zoom current table में unavailable है। PureVideo vertical current official table में 3K तक है। ये restrictions annoyance नहीं हैं; camera processing budget और mode design का हिस्सा हैं।
इसका practical meaning यह है कि recipe बनाते समय sequence होना चाहिए:
पहले final format → फिर resolution/fps → फिर color/processing mode → फिर focus/tracking/zoom → फिर exposure/audio। अगर आप पहले favorite filter चुनते हैं और बाद में 8K करने जाते हैं, option गायब हो सकती है। अगर 4K120 select करके बाद में zoom चाहते हैं, current spec आपको allow नहीं करती। अगर night में PureVideo select करके I-Log खोजेंगे, वह intentionally incompatible है।
“Professional” workflow में भी simplicity की value है। Client को same-day Reel चाहिए, light controlled है और heavy grade का समय नहीं—Standard color ज्यादा professional business decision हो सकती है क्योंकि turnaround पूरा होगा। दूसरी तरफ ad/product film में shots match करने हैं, highlights/shadows को carefully grade करना है और editor color-managed pipeline समझता है—तब I-Log का extra work justified है।
Dolby Vision का भी यही logic है। HDR capture तभी advantage बनेगा जब edit, preview और delivery chain इसे preserve करे। अगर final output SDR है या client devices unpredictable हैं, Standard/graded SDR workflow ज्यादा predictable हो सकती है। Feature का premium नाम decision criterion नहीं होना चाहिए; final viewing path होना चाहिए।
Filters और Beauty के साथ “baked-in” nature याद रखें। Recording के समय लगाया effect बाद में उतनी flexibility से undo नहीं होता जितना neutral source पर post effect। इसलिए high-stakes product color, skin tone या brand work में conservative capture safer हो सकता है। Fast social content जहाँ speed ज्यादा important है, baked filter useful है।
I-Log exposure के मामले में भी camera की manufacturer-claimed dynamic range को permission न समझें कि highlights clip कर दें या shadows severely underexpose करें। Log grading latitude देता है, bad exposure को magic से correct नहीं करता। Luna Pro body पर histogram न होने के कारण app histogram controlled shoots में particularly useful है। अगर ND filter use कर रहे हैं तो final exposure monitoring और भी important हो जाती है।
एक final compatibility habit: firmware update के बाद अपने saved workflow को 5-minute regression test दें। 4K30 Standard, 4K60, PureVideo, I-Log, vertical mode, tracking और Profile load करके देखें कि menu/options वही हैं। यह article 17 September 2026 की current documentation पर based है; firmware camera की available combinations बदल सकती है। “कल काम करता था” future compatibility guarantee नहीं।
5 Useful Camera Profiles बनाकर Settings बार-बार बदलने की Problem कैसे खत्म करें?
Luna Series का Profile feature इस guide का सबसे useful लेकिन easily misunderstood part है। Official docs के अनुसार Profiles Photo, Video और PureVideo में supported हैं; Slow-Mo, Timelapse और TimeShift में नहीं। Up to eight profiles add की जा सकती हैं, और camera में default profiles pre-loaded नहीं हैं। [20]
Profile “हर camera setting save” नहीं करती। Current documented included parameters हैं: Beauty, in-camera Filter, Color (Standard/Dolby Vision), Shutter, ISO, WB, Metering, Focus, Breathing Compensation और Sharpness। LUT file included नहीं है। Importantly, official list resolution/fps, gimbal mode, audio mode, tracking और I-Log को saved profile fields के रूप में list नहीं करती। [20]
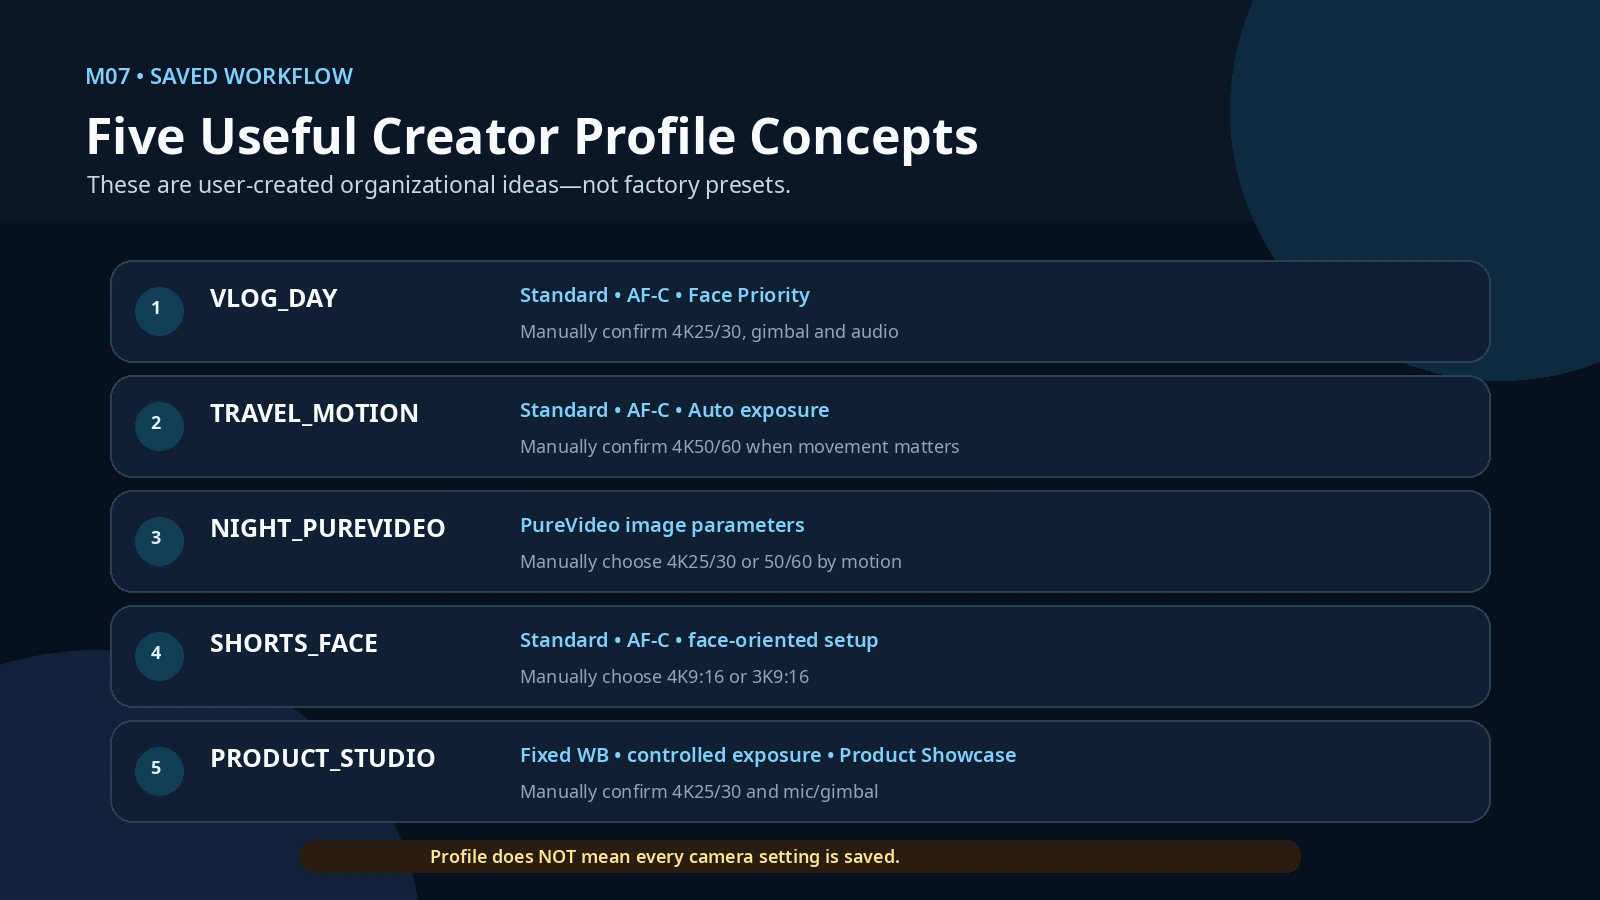
इसलिए नीचे के पाँच names user-created organizational concepts हैं, factory presets नहीं। इन्हें Profile feature की documented limits के भीतर use करें; resolution/fps/gimbal/audio जैसी बाकी settings manually verify/set करनी पड़ सकती हैं।
1) VLOG_DAY
Image parameters: Standard, Auto/semi-auto exposure, AWB, Face Priority if your face is main subject, AF-C, conservative Sharpness/processing.
Manual check before record: 4K25/30, Roll Lock, Medium follow, Voice Enhancement + Front if speech.
Use: everyday vlog, YouTube, casual creator work.
2) TRAVEL_MOTION
Image parameters: Standard, Auto exposure, AWB, Matrix or Face Priority based on scene, AF-C.
Manual check: 4K50/60 when movement matters, 4K25/30 when light/efficiency matters, Roll Lock, Medium follow.
Use: walking, street, transport, moving travel scenes.
3) NIGHT_PUREVIDEO
Because Profile officially supports PureVideo, you can save documented image-related settings that apply there—WB/exposure/focus choices within current mode capability.
Manual check: PureVideo 4K25/30 quality-first or 4K50/60 movement-first; vertical night requires 3K rather than 4K current support.
Use: night market, restaurant exterior, dim street.
4) SHORTS_FACE
Image parameters: Standard, Face Priority, AF-C, preferred light Beauty only if intentionally wanted.
Manual check: 4K9:16 25/30 talking/detail, or 3K9:16 50/60 for movement; Roll Lock; tracking as needed.
Use: Reels, Shorts, quick social face content.
5) PRODUCT_STUDIO
Image parameters: Standard or Dolby depending delivery, fixed WB, controlled shutter/ISO, Product Showcase, Breathing Compensation if useful, minimal processing.
Manual check: 4K25/30, gimbal/lock framing, external mic.
Use: unboxing, gadget/beauty/food demonstration.
इन profiles का सबसे बड़ा benefit speed है: हर बार WB, focus, metering, color जैसी image parameters याद नहीं करनी पड़तीं। लेकिन अगर आप Profile load करके assume कर लें कि 4K30, gimbal speed और audio भी saved हैं, current official docs उस assumption को support नहीं करतीं।
I-Log-specific custom “profile” naming भी caution से करें। Official Profile list Standard/Dolby color को included बताती है, I-Log को नहीं। इसलिए I-Log workflow को manual verification के साथ अलग रखें।
QR-based profile sharing useful हो सकती है, लेकिन किसी creator की profile blindly scan करके “best” मत मानें। उनका light, shutter philosophy, skin tone, delivery और firmware अलग हो सकता है। Profile convenience है, universal truth नहीं।
Final Cheat Sheet: कौन-सी Setting कब Use करनी है?
अब पूरी guide को एक field decision system में compress करते हैं।
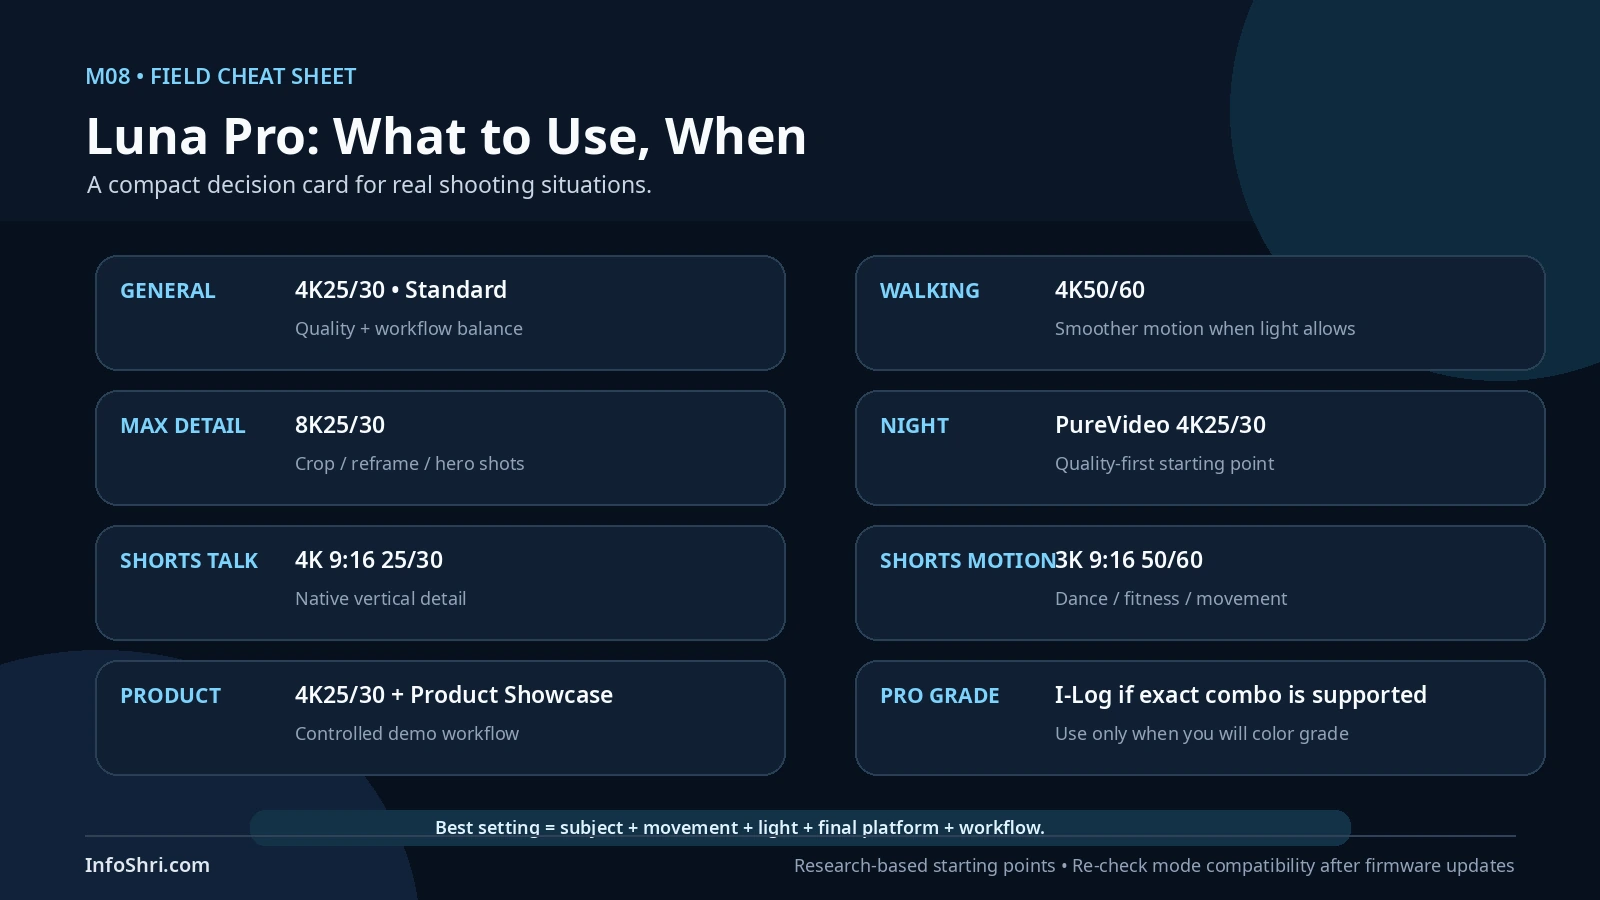
Best general YouTube setting: 4K25/30, Standard, Auto/semi-auto exposure, AWB, AF-C, Roll Lock, Medium follow. Voice-led vlog में Voice Enhancement + Front test करें।
Best beginner setting: वही 4K25/30 Standard setup। Manual exposure तब तक जरूरी नहीं जब तक Auto आपको shot miss नहीं करा रही।
Best vlogging setting: daylight normal vlog में 4K25/30; motion-heavy walking में 4K50/60. Low light आते ही frame rate और mode फिर से सोचें।
Best walking setting: bright light में 4K50/60 smooth-motion starting point; dim light में 4K25/30 more light-efficient हो सकती है।
Best maximum-detail setting: 8K25/30. इसे selected hero/detail/crop shots में use करें, पूरा दिन default न बनाएं।
Best 8K setting: 8K25 या 30 depending timeline/lighting, 1× quality-first framing; 2× Clarity Zoom composition जरूरत पर। Filters current 8K में supported नहीं।
Best 4K setting: 4K25/30 general use; 4K50/60 movement; 4K100/120 specialized action/slow-motion.
Best low-light setting: PureVideo 4K25/30 quality-first starting point। Movement priority हो तो 4K50/60 test करें। Normal Video में Low-Light Enhancement auto-trigger हो सकती है।
Best Shorts setting: talking/detail के लिए native 4K9:16 25/30; dance/fitness/movement के लिए 3K9:16 50/60; night PureVideo vertical 3K.
Best dance/fitness setting: 3K9:16 50/60 vertical, tracking rehearsal, Medium/Fast follow depending movement.
Best travel setting: 4K25/30 default + 4K50/60 movement + selected 8K hero shots + PureVideo night. एक mode पूरे दिन नहीं।
Best talking-head setting: 4K25/30, fixed WB, controlled exposure, AF-C, Face Priority, external mic when possible.
Best product-review setting: 4K25/30, fixed WB, controlled light, Product Showcase, Breathing Compensation only if it improves transitions, 2× Clarity Zoom when detail framing needs it.
Best fast-action setting: 4K50/60 real-time; 4K100/120 slow-down flexibility. 4K100/120 पर zoom current official table में unavailable है।
Best slow-motion setting: Dedicated Slow-Mo 4K100/120; extreme temporal slow-down के लिए 1080p200/240.
Best professional color setting: I-Log only when you will grade and current camera menu supports the exact resolution/fps combination you selected. PureVideo, Dolby Vision और Beauty simultaneously नहीं।
Best audio setting for speech: Voice Enhancement + Front is a logical built-in starting point; external mic placement can matter more.
Best wind setting: Wind Reduction. Result को headphones पर check करें क्योंकि processing ambience/tone बदल सकती है।
Best gimbal default: Roll Lock + Medium follow.
Best focus default: moving creator/vlog = AF-C; static subject = AF-S; product toward lens = Product Showcase.
Best mode if you hate editing: Standard.
Best mode if you color grade: I-Log, with controlled exposure and a real color-managed workflow.
When to use 8K: crop/reframe, architecture, landscape, product detail, important master shot.
When not to use 8K: long casual vlog, high-fps action, simple fast edit, storage/battery/heat-sensitive shooting.
When to use 60fps: movement, smooth real-time delivery, potential 2× slow-down on 30fps timeline.
When not to use 60fps: dim light where extra temporal resolution is less important than exposure efficiency.
When to use I-Log: serious grading, matching shots, controlled professional post-production.
When not to use I-Log: no grading, fast upload, PureVideo low-light need, Beauty/Dolby workflow.
Final beginner rule: अगर doubt हो, 4K25/30 Standard + Auto exposure + AWB + AF-C + Roll Lock लगाइए और shot बनाइए। Camera की capability आपके content से ज्यादा important नहीं है।
Final advanced-creator rule: resolution और “Pro” badge से पहले यह पूछिए—final delivery क्या है, movement कितना है, light कितनी है, shutter क्या कर रहा है, कौन-से features इस mode में बंद हो जाते हैं, और post-production में आप वास्तव में कितना काम करेंगे?
यही Luna Pro की best-settings philosophy है: एक perfect setting मत खोजिए। जिस shot को बनाना है, उसके लिए सही setting बनाइए।
Current official-source conflicts / uncertainty note: 17 September 2026 तक Luna Series current specifications page maximum video bitrate 150Mbps दिखाती है, जबकि current Luna Pro File Format FAQ 120Mbps कहती है। Exact public official firmware build number support page पर listed नहीं मिला। I-Log और Dolby Vision के हर resolution/fps combination की complete Luna Pro-specific public matrix भी नहीं मिली। इसलिए article ने इन unresolved points पर attractive number चुनकर fact नहीं बनाया है। Firmware/app update के बाद camera menu और current official support table recheck करें।
Sources & research notes
[1] Insta360, Luna Series: Photo & Video Specifications — https://onlinemanual.insta360.com/lunaultra/en-us/specs/shooting
[2] Insta360, Luna Series: Low-Light Enhancement — https://onlinemanual.insta360.com/lunaultra/en-us/operation-tutorials/shooting-preview/shooting-function/low-light
[3] Insta360, Luna Series: Check and Update Firmware Version — https://onlinemanual.insta360.com/lunaultra/en-us/operation-tutorials/system-operation/firmware
[4] Apple App Store India, Insta360 app — https://apps.apple.com/in/app/insta360/id1491299654
[5] Family Pop TV, “Why I Keep Reaching for This Tiny Camera | Insta360 Luna Pro Review,” 10 Sep 2026 — https://www.youtube.com/watch?v=mz1tOlpapdk
[6] Digital Camera World, Insta360 Luna Pro review, 14 Sep 2026 — https://www.digitalcameraworld.com/cameras/gimbals/insta360-luna-pro-review
[7] TechRadar, Insta360 Luna Pro review, Sep 2026 — https://www.techradar.com/cameras/video-cameras/insta360-luna-pro-review
[8] Insta360, Luna Series: File Format Related FAQ — https://onlinemanual.insta360.com/lunapro/en-us/operation-tutorials/sdcard-file-storage/file-format
[9] Insta360, Luna Series: Audio Mode — https://onlinemanual.insta360.com/lunaultra/en-us/operation-tutorials/audio/audio-mode
[10] Insta360, Luna Series: Sound Direction — https://onlinemanual.insta360.com/lunaultra/en-us/operation-tutorials/audio/sound-direction
[11] Insta360, Luna Series: Basic Mode and Pro Mode / Luna Pro Touchscreen Operation — https://onlinemanual.insta360.com/lunapro/en-us/camera/basic/screenoperation
[12] Insta360, Luna Series: Gimbal Mode — https://onlinemanual.insta360.com/lunaultra/en-us/operation-tutorials/system-operation/gimbal-mode
[13] Insta360, Luna Series: Auto Tracking and Smart Framing — https://onlinemanual.insta360.com/lunaultra/en-us/operation-tutorials/shooting-preview/shooting-function/smart-tracking
[14] New Edge Times / Trusted Reviews-syndicated Luna Pro review, Sep 2026 — https://www.newedgetimes.com/insta360-luna-pro-review-brilliant-but-hard-to-recommend/
[15] Pozo Production, Luna Pro review / PureVideo low-light testing — https://www.pozoproduction.com/blog/is-the-insta360-luna-pro-worth-it-my-honest-review
[16] Insta360, Luna Series: I-Log Mode — https://onlinemanual.insta360.com/lunaultra/en-us/operation-tutorials/shooting-preview/shooting-specs/i-log
[17] The Verge, Insta360 Luna Pro launch coverage, 12 Sep 2026 — https://www.theverge.com/gadgets/993837/insta360-luna-pro-steadicam-gimbal-release-price-specs
[18] Insta360, Luna Series: Filter Settings — https://onlinemanual.insta360.com/lunaultra/en-us/operation-tutorials/shooting-preview/shooting-specs/filters
[19] Insta360, Luna Series: In-camera Beauty Feature — https://onlinemanual.insta360.com/lunaultra/en-us/operation-tutorials/shooting-preview/shooting-specs/beauty
[20] Insta360, Luna Series: Adding and Sharing Profiles — https://onlinemanual.insta360.com/lunapro/en-us/operation-tutorials/shooting-preview/shooting-specs/recipes
Related InfoShri guides verified during this research:
Insta360 Luna Pro Review — https://infoshri.com/insta360-luna-pro-review/
Luna Pro 8K Explained — https://infoshri.com/insta360-luna-pro-8k-explained/
Luna Pro Low-Light Test Explained — https://infoshri.com/insta360-luna-pro-low-light-test/
Luna Pro Vertical Video — https://infoshri.com/insta360-luna-pro-vertical-video/
Luna Pro Full Specifications Explained — https://infoshri.com/insta360-luna-pro-specs/
Luna Pro Travel Vlogging Guide — https://infoshri.com/insta360-luna-pro-travel-vlogging/
Luna Pro Battery Life Guide — https://infoshri.com/insta360-luna-pro-battery-life/
Luna Pro Storage Guide — https://infoshri.com/insta360-luna-pro-storage-guide/
Luna Pro vs DJI Osmo Pocket 3 — https://infoshri.com/insta360-luna-pro-vs-dji-osmo-pocket-3/
Luna Pro vs Luna Ultra — https://infoshri.com/insta360-luna-pro-vs-luna-ultra/
Sources
- Insta360 Luna Series Photo & Video Specifications
- Insta360 Luna Series Low-Light Enhancement
- Insta360 Luna Series Firmware Update
- Insta360 Luna Series File Format FAQ
- Insta360 Luna Series I-Log Mode
- Insta360 Luna Series Filters
- Insta360 Luna Series Beauty
- Insta360 Luna Series Profiles
- Insta360 Luna Series Auto Tracking
- Insta360 Luna Series Gimbal Mode
- Insta360 Luna Series Audio Mode
- Insta360 Luna Series Sound Direction
- TechRadar Luna Pro review
- Digital Camera World Luna Pro review
- The Verge Luna Pro launch coverage
- Family Pop TV Luna Pro real-world review

Keep exploring